Jboss4集群配置之二:Jboss集群配置实例与负载均衡器配置
2007/10/10 10:491.前言
2.集群准备知识
3.Jboss集群配置实例概述
4.Jboss集群负载均衡器mod_jk配置
3.Jboss集群配置实例概述
下文中,jijian91将以实例来叙述Jboss集群配置。
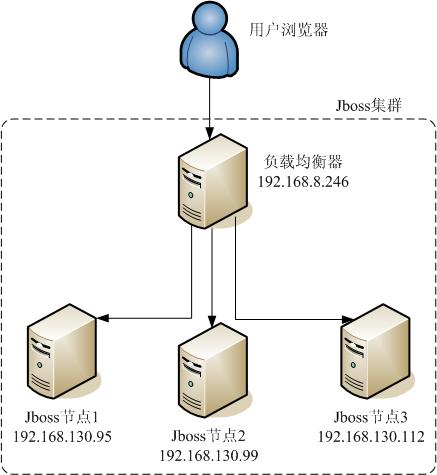
该实例包含3个Jboss节点。各节点被动接收负载均衡器转发的请求。各节点间没有横向的联系。

4.Jboss集群负载均衡器配置
步骤
先安装apache,然后配置mod_jk模块。
安装apache
下载apache代码包,上传到服务器。
解开代码包
tar xfvz httpd-2.2.4.tar.gz
编译
./configure –prefix=/usr/local/apache2 –enable-module=so –enable-module=setenvif –enable-module=rewrite –enable-rewrite=shared –enable-proxy=shared –with-mpm=prefork –enable-so –enable-auth-anon –enable-file-cache=shared –enable-cache=shared –enable-disk-cache=shared –enable-mem-cache=shared
make clean
make
make install
修改配置。本例中,jijian91使用的监听端口是8080,请根据实际情况修改。
vi /usr/local/apache2/conf/httpd.conf
将Listen 80改成Listen 8080
将User daemon和Group daemon改为User apache和Group apache
删除ServerName前的#,将该行改为ServerName 127.0.0.1:8888
添加用户和用户组
groupadd apache
useradd apache –g apache
apache mod_jk配置
下载mod_jk,将其改名为mod_jk.so,拷贝到/usr/local/apache2/modules下。
顺便说一句,找mod_jk模块费了jijian91很大精力,最后才在http://www.apache.org/dist/tomcat/tomcat-connectors/jk/binaries/linux/目录下找到。我用的是mod_jk 1.2.23,看到本文的时候,mod_jk应该有新版了。但mod_jk的向下兼容做得不太好,最好先用mod_jk 1.2.23调试,成功后再尝试换用新版mod_jk。
chmod +x /usr/local/apache2/modules/mod_jk.so
在/usr/local/apache2/conf/httpd.conf的末尾增加:
Include conf/mod_jk.conf
建立空文件/usr/local/apache2/conf/uriworkermap.properties
vi /usr/local/apache2/conf/mod_jk.conf,输入以下内容:
# Load mod_jk module
# Specify the filename of the mod_jk lib
LoadModule jk_module modules/mod_jk.so
# Where to find workers.properties
JkWorkersFile conf/workers.properties
# Where to put jk logs
JkLogFile logs/mod_jk.log
# Set the jk log level [debug/error/info]
JkLogLevel info
# Select the log format
JkLogStampFormat “[%a %b %d %H:%M:%S %Y]”
# JkOptions indicates to send SSK KEY SIZE
JkOptions +ForwardKeySize +ForwardURICompat -ForwardDirectories
# JkRequestLogFormat
JkRequestLogFormat “%w %V %T”
# Mount your applications
JkMount /application/* loadbalancer
# You can use external file for mount points.
# It will be checked for updates each 60 seconds.
# The format of the file is: /url=worker
# /examples/*=loadbalancer
JkMountFile conf/uriworkermap.properties
# Add shared memory.
# This directive is present with 1.2.10 and
# later versions of mod_jk, and is needed for
# for load balancing to work properly
JkShmFile logs/jk.shm
# Add jkstatus for managing runtime data
JkMount status
Order deny,allow
Deny from all
Allow from 127.0.0.1
vi /usr/local/apache2/conf/workers.properties,增加以下内容:
# Define list of workers that will be used
# for mapping requests
worker.list=loadbalancer,status
# Define Node1
# modify the host as your host IP or DNS name.
worker.node1.port=8009
worker.node1.host=192.168.130.95
worker.node1.type=ajp13
worker.node1.lbfactor=1
# Define Node2
# modify the host as your host IP or DNS name.
worker.node2.port=8009
worker.node2.host= 192.168.130.99
worker.node2.type=ajp13
worker.node2.lbfactor=0
# Define Node3
# modify the host as your host IP or DNS name.
worker.node3.port=8009
worker.node3.host= 192.168.130.112
worker.node3.type=ajp13
worker.node3.lbfactor=1
# Load-balancing behaviour
worker.loadbalancer.type=lb
worker.loadbalancer.balance_workers=node1,node2,node3
worker.loadbalancer.sticky_session=1
#worker.list=loadbalancer
# Status worker for managing load balancer
worker.status.type=status
说明:
worker.node1.host、worker.node2.host和worker.node3.host要改成jboss集群各机器的实际IP.
如果有更多的节点,顺序定义更多的node段,并在worker.loadbalancer.balance_workers后全部列出.
lbfactor是负载分配权重,值越大分配的负载越多.
更多配置参数详见tomcat配置说明
配置apache自动启动
ln –s /usr/local/apache2/apachectl /etc/init.d/apache
chmod 777 /etc/init.d/apache
ln –s /etc/init.d/apache /etc/rc3.d/S80apache
ln –s /etc/init.d/apache /etc/rc3.d/K20apache
ln –s /etc/init.d/apache /etc/rc4.d/S80apache
ln –s /etc/init.d/apache /etc/rc4.d/K20apache
ln –s /etc/init.d/apache /etc/rc5.d/S80apache
ln –s /etc/init.d/apache /etc/rc5.d/K20apache
下一篇:Jboss集群节点配置
转载请注明来自:jijian91与小z - 编程
永久链接:https://jijian91.com/blog20071010/jboss-cluster-part2.html
 京公网安备11010802040563号